
Airflow is a great open-source workflow management platform developed by AirBnB. At my current company, we adopted it as a major and critical piece of our daily operation.
Compared to our previous home-grown batch processing jobs stitched together with Ruby, Sidekiq, Cronjob, Airflow provides a much more superior way to orchestrate and process our data pipeline.
Since Airflow is written in Python and the DAGs (Direct Acyclic Graph) are also pure Python code, developing new Airflow jobs is quite straightforward.
Here are some tips and insights to help you work with Airflow easier.
Good understanding of all Airflow concepts
It’s critical to understand the different concepts in Airflow:
Airflow Webserver/Scheduler: think of it as an Operating System to execute different applications. The Scheduler will periodically polls for new Task to execute and the Airflow Webserver provides the Dashboard GUI.
DAG – Direct Acyclic Graph. Think of the DAG as an application that will be executed inside Airflow. You construct the DAG by connecting different Tasks and Operators, and Airflow will handle the execution from the starting task all the way to the last one. If there’s an error or exception when a task is executed, Airflow will stop the downstream tasks from running.
Task/Operator: the actual work horse of your Dag. Think of Operator as functions in your application. One Operator can return data or manipulate resources (files, API) that subsequent Operators can take the results and continue processing.
For example, you can have a PythonOperator to execute a pure Python method, or SSHOperator to SSH files to a remote server as part of your pipeline.
Airflow provides lots of built-in Operators, and it’s simple to create new Operator to suite your need as well.
XCom: (a.k.a.Cross-Communication): a Key-Value specific to your Dag run to let different tasks within the Dag to share data. You can leverage XCom quite elegantly to share data between the tasks to simplify your DAG design.
Variables: shared Key-Value store within Airflow that can be accessed by all DAGs (and tasks)
Connections: shared connection information that can store sensitive passwords in encrypted forms so that the DAGs can safely use these resources without revealing sensitive information.
Airflow DAGs are Python applications
DAGs are written in Python, so good understanding for Python is a must. Because these are little applications that will be triggered and managed by Airflow, it’s critical to write them with good engineering principles: single-responsibility, testable, and DRY.
When you start to have multiple DAGs, make sure you have a good way to structure and share code between them (e.g. putting shared tasks into proper modules and import into your DAG file). As your project grows, good file and code management is very critical.
Running Airflow with Docker
Airflow can be a challenge to setup to run natively on your laptop because you’d need the right Python environment and Postgres, then Airflow itself. Instead, a better option is to run Airflow with Docker so that you can spin up an Airflow environment quickly and cheaply.
Using a Dockerized Airflow setup also makes the development process scalable across team members vs each developer having to install and configure Airflow separately, leading to inconsistency and making it harder to test.
I started out with https://github.com/puckel/docker-airflow (Debian-based) but eventually I developed a custom image to match with our production environment which uses a different flavor of Linux.
And instead of mounting all the available dags, I only mount my active dags inside the Docker container and benefit from executing them true matching Python/Airflow versions. Docker is an amazing piece of technology that really simplifies a developer’s life.
Having a convention for Dag design
You should standardize your Dag design to have certain commonly-named tasks, such as setup, complete so that the dags’ structures are more uniform.
Also, there are multiple ways to run a Dag/Task and if your dag is date-sensitive, handling dates in Airflow can be a bit tricky. The dag can be triggered from the Dashboard, or from the command line with a custom --conf, or via airflow test which only lets you pass in an execution_date value.
I find that it’s a better and simpler design to have the setup task to extract and normalize date values from the context of the dag run and make it available to the subsequent tasks so that other tasks don’t have to deal with such details.
Performance: Don’t construct DAG using Variables
Airflow Scheduler will refresh the dags folder periodically to detect changes to DAGs. It’d parse, execute all the python files, then update its meta database with the latest DAGs information. This process happens quite frequently, and it means that we should optimize the DAGs construction as much as possible to keep Airflow, uhm, flowing.
One common mistake when you construct a DAG with dynamic tasks is to rely on an Airflow variable to build the Dag. Don’t. This can siginificantly slow down Airflow itself since on every DAG refresh, it’d need to execute the DAG python files, connecting to the database to read the variables then construct the DAGs.
A better approach is to store the configuration inside a local config file (e.g. a yaml file) and read the data from here instead to initialize the DAG.
Task should follow the Single Responsibility Principle
Each task should be designed as a discrete method to process one thing. And the task should be idempotent, e.g. running it multiple times should not cause side effects.
One design approach is to have each task to work based on the results from the previous tasks via XCom while providing return values for downstream tasks to consume.
If you find yourself doing more things inside a task, take a minute to see if it makes better sense to split this into separate tasks and connect them.
For example, you need to zip and upload a folder, instead of building a single task to do both, you can split it into a task for zipping, which will return the path to the zipped file, and another task for FTP the file, which will take in the file path and handles the file transfer.
setup >> process >> zip_and_upload >> complete
# better design
setup >> process >> zip >> upload >> complete
The pros with this approach is that you have more visibility into the execution of the tasks. If the upload task fails, you can just restart it and not having to zip the file again.
I also prefer to have "dumber" tasks than smarter tasks. The more logic you put into a task, the less re-usable it is. The more logic and processing you can have earlier in the upstream tasks the better so that the downstream tasks can remain dumb and just focus on their one job.
Designing the Dags with DummyOperator
Airflow has the Graph view to visually display the DAG as a graph. This makes it quite nice to see how the Dag would look and work.
When you in the design phase, instead of having to whip out your favorite diagram application, you can leverage the Graph view and design your DAG using DummyOperator and connect these dummy tasks. Your DAG doesn’t have to work yet, instead, you’re building the scafolding to serve as a point of discussion or further exploration.
from airflow.models import DAG
from airflow.operators.dummy_operator import DummyOperator
dag = DAG(dag_id="process_documents", start_date=datetime(2020, 2, 29))
with dag:
setup_task = DummyOperator(task_id="setup")
complete_task = DummyOperator(task_id="complete")
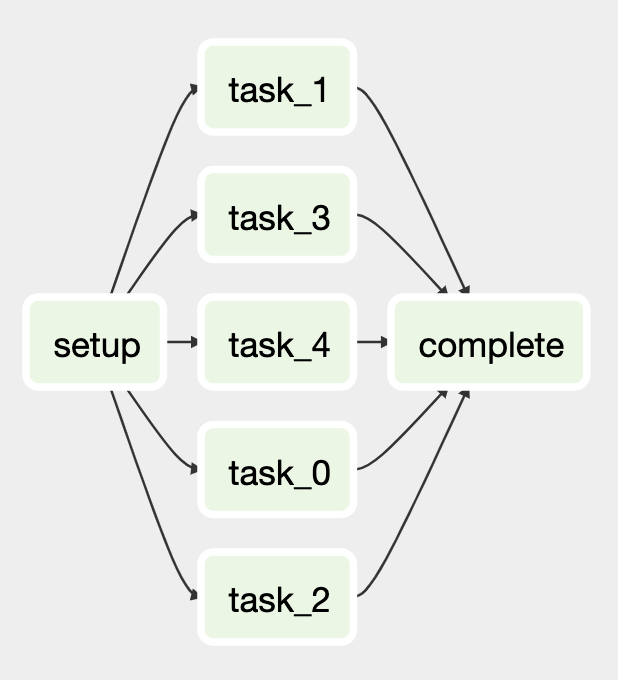
for i in range(5):
task = DummyOperator(task_id=f"task_{i}")
setup_task >> task >> complete_taskThis would give you this DAG in a few lines of code:
Also, you can think about your tasks as series of method calls that pass data from one stage to another, especially if you’re planning to use PythonOperator.
Getting a Productive Development Flow
As you are developing a dag, how do you really execute it to test the functionality? Of course you want to run the Dag inside the real Airflow environment, but you can’t really development and test run your code via the web interface, that would be too slow and cumbersome.
Luckily, Airflow provides the airflow command line with different mechanisms to trigger your code and it’s great to leverage this tool to help speed up your development flow.
Here is to trigger your Dag from the command line and passing in arguments:
airflow trigger_dag <dag_id> --conf {\"key\": \"value\"}Even better, to execute a specific task with the dag:
airflow
test <dag_id> <task_id> YYYY-MM-DDairflow test is incredibly useful when you’re developing your Dag since it lets you focus in running a particular task, making your development cycle as a simple of code change/trigger task without having to re-execute the whole Dag, which would take a lot longer.
For example, if you are to test the task_0 the process_documents dag above, you can do this
export EXECUTION_DATE=2020-02-29
airflow test process_documents setup $EXECUTION_DATE
airflow test process_documents task_0 $EXECUTION_DATE
Here we define an environment variable to store the execution date, and we can pass this to the task without having to type the date every time.
Also, you can have setup to push data to XCom, and then task_0 woud read from that. By running the tasks in the correct order as defined in the Dag, you can keep working on the task_0 and re-executing it until you’re happy.
Debugging your Dag
Since we’re writing in Python, we can leverage Python’s debugging mechanism to help debug the Dag.
You can create a breakpoint with import pdb; pdb.set_trace() anywhere in your code, and when you run the task using airflow test, you will be dropped right into your breakpoint. This is very similar to Ruby’s debugger or byebug breakpoints.
Leverage method return value for PythonOperator
PyhonOperator makes it super easy to wrap Python code as a task, and furthermore, whatever return value the Python method returns, Airflow would store this automatically inside XCom under the key return_value, making it available for other tasks.
You can write an util method like task_return_value(context, task_id) that lets you access the return value as follow:
def task_return_value(context, task_id="setup"):
    return  context['task_instance'].xcom_pull(task_ids=task_id,key="return_value")
This truly will make connecting PythonOperator tasks together much nicer and more natural. As you can see in the setup() method below, it returns a dict, and the process_documents task can simply access it later. We then don’t have to call xcom_pull explicitly, which I think its syntax is quite unwielding, and I much prefer DSL, English-like, descriptive methods.
Inline Methods for PythonOperator
PythonOperator lets you execute Python code inside your DAG, and to me, it’s one of the reasons why Airflow is so flexible.
But you don’t have to use it directly, you can write a function to return a custom PythonOperator. Also, you can leverage inline functions to keep your code together as a unit, making writing PythonOperator much nicer and neater.
Also, Python offers closures so in the function that return the custom PythonOperator, you can use the nonlocal Python keyword to access the outer-scope variables, especially when you have optional keyword-arguments (e.g. def process_documents_task(document_type, settings=None))
import logging
from airflow.models import DAG
from airflow.operators.python_operator import PythonOperator
def task_return_value(context, task_id="setup"):
    return  context['task_instance'].xcom_pull(task_ids=task_id,key="return_value")
def setup_task():
    # look, I'm an inline method!
    def setup(ds,**context):
        return {
            "base_path": f"{ds}/my_dag"
        }
    return PythonOperator(
        task_id=f"setup",
        python_callable=setup,
        provide_context=True)
def process_documents_task(document_type):
    def process(**context):
        nonlocal document_type
        base_path = task_return_value(context, 'setup')["base_path"]
        # your processing code here
        return path_to_processed_files
    return PythonOperator(
        task_id=f"process_{document_type}",
        python_callable=process,
        provide_context=True)
def complete_task():
    def complete(ds,**context):
        logging.info("Complete!")
        pass
    return PythonOperator(
        task_id=f"complete",
        python_callable=complete,
        provide_context=True)
dag = DAG(dag_id="process_documents", start_date=datetime(2020, 2, 29))
with dag:
    setup    =  setup_task()
    complete =  complete_task()
    for document_type in ["csv", "txt"]:
        process_documents = process_documents_task(document_type)
        setup >> process_documents >> complete
This would return this dag:

Test-Driven Development (TDD) for Airflow Dags
Since you’re writing Python code that will be executed inside Airflow, you can implement integrated test suite to test your Dags and verify its behavior. This is a much deeper topic that I will write more on in the near future, but yes, you can (and really should) have a well-designed regression test suite to test your dags.
With Python’s unittest and unittest.MagicMock, it’s quite straight forward to mock and stub our values to make testing your dag deterministic.
Final words
Airflow is a very powerful and flexible piece of software but its documentation doesn’t have too much on how to write and develop the Dags. I hope with these tips, you can super-charge your Airflow develpment. If you have any question regarding Airflow, please don’t hesitate to reach out.
Leave a Reply